Saturday, March 24, 2012

Shower Sweets

My sister's baby shower this weekend was pretty much just an excuse for me to haul out my new cupcake stand.

 Found a lot of cute blue candy; if anyone didn't know the baby's gender when they came, they didn't have a choice by the time they left. :) 

Simply cut a hole in a plastic baggie and piped the chocolate frosting in swirls. Yeah, I'm cheap.

 I found those little plastic trifle dishes at Zurchers and filled them with whipped cream, strawberries, and a graham cracker crust. They came with little, tiny spoons. I don't know what it is about tiny food and tiny dishes and tiny utensils, but I LOVE IT!

The cupcakes once I inserted my toppers. I individualized them to his name, his weight at birth, ect. The blue rock candy was a nice addition. Not necessarily for eating, but looked sparkly!! Can't go wrong there!


The Layout

  
The white cupcake wrappers were my favorite. I may have to start buying in bulk. Added such an elegant touch! Also found those at Zurchers. 


And my niece after she'd finished through the food line. I think she missed the actual food somewhere in there. 

Sunday, March 4, 2012

Collar Necklace

Had way too much fun crafting this one. With a little more classy look (despite the buttons), I added the micro beads as a finishing touch of purple that I think brings it together perfectly!!


Headbands Galore!


I absolutely love headbands!! Love 'em! So I was just messing around and found two of my new favorite headbands!!! I started by making a couple twist flowers. 


I just love it!! Totally by accident but already one of my favorites!


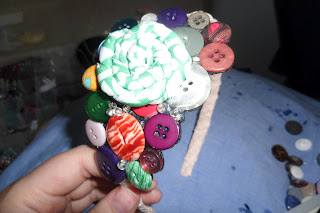
The next one was inspired by one of my true loves... yep... BUTTONS!!!


I just love! Muahh!!!

Ruffle Necklace


I love the whole flower necklace thing that's become popular as of late. So I decided to give it a go. One thing I love... firing up the glue gun and starting something I have no idea how it's going to turn out... or whether it will!

I start with my usual and trustworthy square of felt.


Cut out many, many, many circles of fabric (I'm using extremely sheer material, but you can easily use cotton too, or almost any other material you'd like). 


Bunch the material from the center to give it that lovely petal-looking wave.


Take a dot of hot glue and set the bunched fabric down until it sets.


Continue gluing the fabric to the center evenly surrounding that middle part until you have a cute little bud.


Now you're going to do this four more times. I like doing three larger ones and two smaller ones. But five larger ones work too. Trim the felt on the bottom too so it's pretty unnoticeable. 


By the way (and just in case you can't already tell) I kind of air on the side WAY too many photos.


Next I lay the flowers down in a half-moon kind of shape and glue down with my trusty glue gun. Seriously, I'd take that thing down a dark alley with me if possible. I have three welts on my hands from the darn thing!


Cut out the felt underneath until it's not visible from the front


Glue some chain on the back and add some clasps on the end. It's that simple!! I just love this look! It's so classy and could go with just about anything!!


Looks great with anything!! Cute t-shirt, skinny jeans, cardigan, ballet flats, but this... THIS will be what makes the outfit!!!

Eight-Leaf Organza Flower

Alrighty folks. It took a bit of getting used to the whole snapping photos at each step. But I think I got the major steps down. This is a flower that I kind of created myself. The key to me to get it to sit right was to singe the petals before putting it all together. Ready? Alright, then let's get started.


First cut organza material (or any other material that crinkles when it's singed) into ovals. I just fold up the material and cut them all at once.


Next take the petals, one by one, and hold over a flame until the edges crinkle. This will also stop the material from fraying as you continue to work with it and later wear it.


I also like to then burn the middle of the fabric so it gets a nice, antiqued look.


It will take a few minutes and a few toasty fingers....
 \


Next I take a square of felt and glue one of the petal ends to it.


I always make sure to have five petals on the bottom layer. Otherwise, it always looks lopsided to me, but that might be my OCD talking... :)


On the next layer I usually only need three. It's hard to see because of the color of the fabric, but there's a flat spot in the middle where I've been gluing all the petals down.


So I take one more petal and curl it around itself...


And glue it to the center to give it a bud look.

I then trim the felt in back until I hit glue.


And voila!! It's that easy!! And then from there, you can add it to so many different kinds of fashion. Hair pins, bracelets, necklaces, headbands. You name it!